|
|
Back to front axle Forward to tank / fuel pump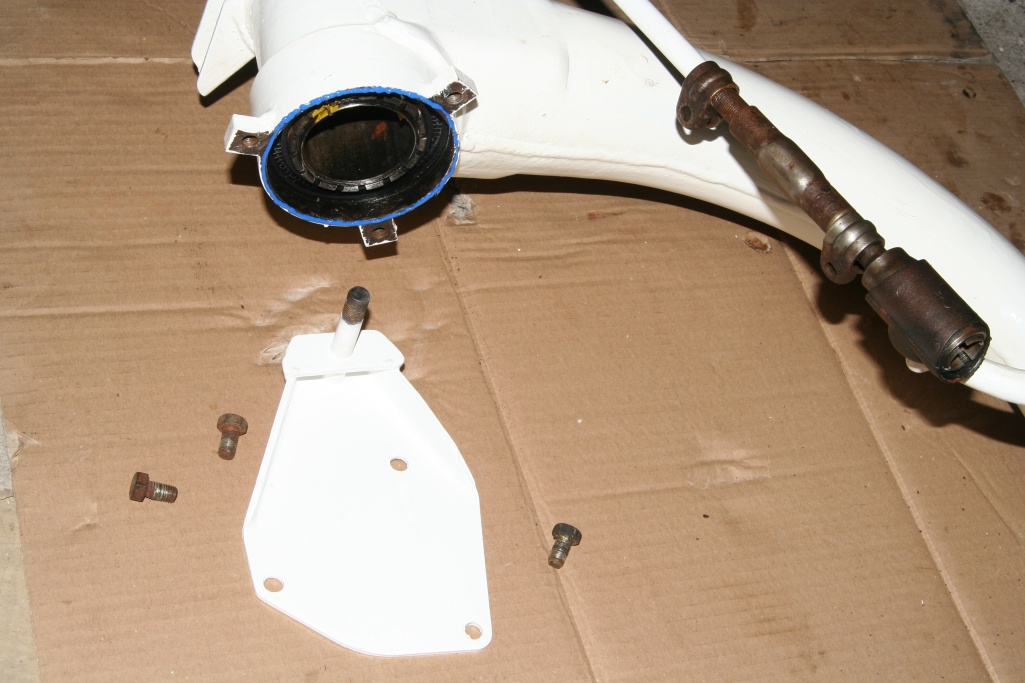 Cover for the bearing of the front axle - right version. At this cover the front shock absorber is fastened. In the original state my duck was here sealed with a plasticine. I used silicone mass here. 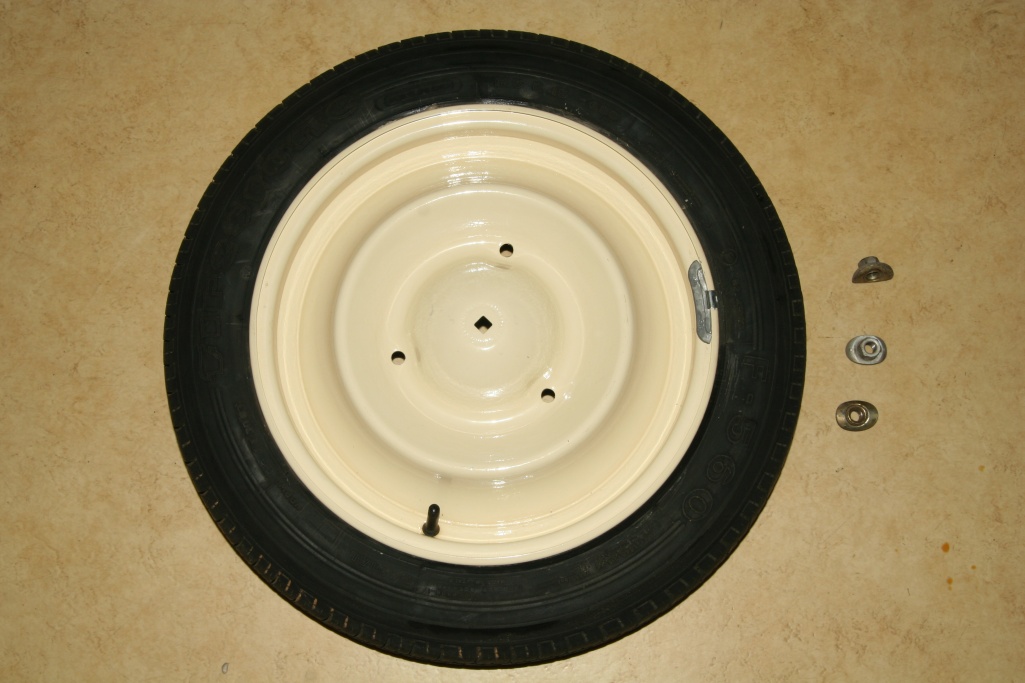 The wheels: 2CV's possess a tyre with the size of 125 x R15. That means the tire is 125mm wide (tires smaller than that are not available for cars) and they are installed on rims with a diameter of 15inches. R stands for the type 'radial', which means that the steel reinforcement is just as arranged. The arrangement of the reinforcement in diagonal arrangement is today no longer common (marking 'D' or '-'). A further important coinage on the tire flanks is the so-called 'DOT' - number (Department Of Transportation, USA). This indicates the age of the tires and is coded with four digits starting from the production year 2000 (you really shouldn't by older tires). The first two digits indicate the production week and the last two the production year. That means the coinage 2303 stands for 23rd week of the year 2003. A characteristic of the duck wheels is the attachment with only 3 wheel nuts. That makes a balancing a little bit complicated, since today's rims are fastened always with 4 nuts and the appropriate machines have to be converted for the duck wheels. Nevertheless this should be done, because unbalanced mass lead to unnecessary abrasion of the steering element. Tire pressure is specified by the manufacturer with 1.4 bar in front and 1.6 bar in the back. Among 2 CV drivers it's controversly discussed. The majority drives with higher air pressure up to 2,2 bar in front and back. I gave 1.8 bar in front and in the back 2.0 bar pressure. Thus the tires look to be very roundly and I will report about unequal abrasive her if I'll find some. Apropos abrasive: Since the duck is quite lightweight and speeds beyond the 100km/h are reached rarely, this abrasive of the tires is very small (at least if you don't out-drift every turn up to the curbs). That makes the moneybag happy, because you can drive many kilometers with a set of the quite expensive tires. Nevertheless you should accomplish a tire change after 10 years, even if the depth of profile (1.6mm is legally prescribed, to be recommended 3.0mm) is still sufficient. The rubber mixture of the tires becomes harder and brittle with increasing age, which means that the grip decreases and the danger of a tire burst increases. The smaller adhesion increases stronger with winter tires. Thus leave the fingers of such sometimes offered waste rubber! 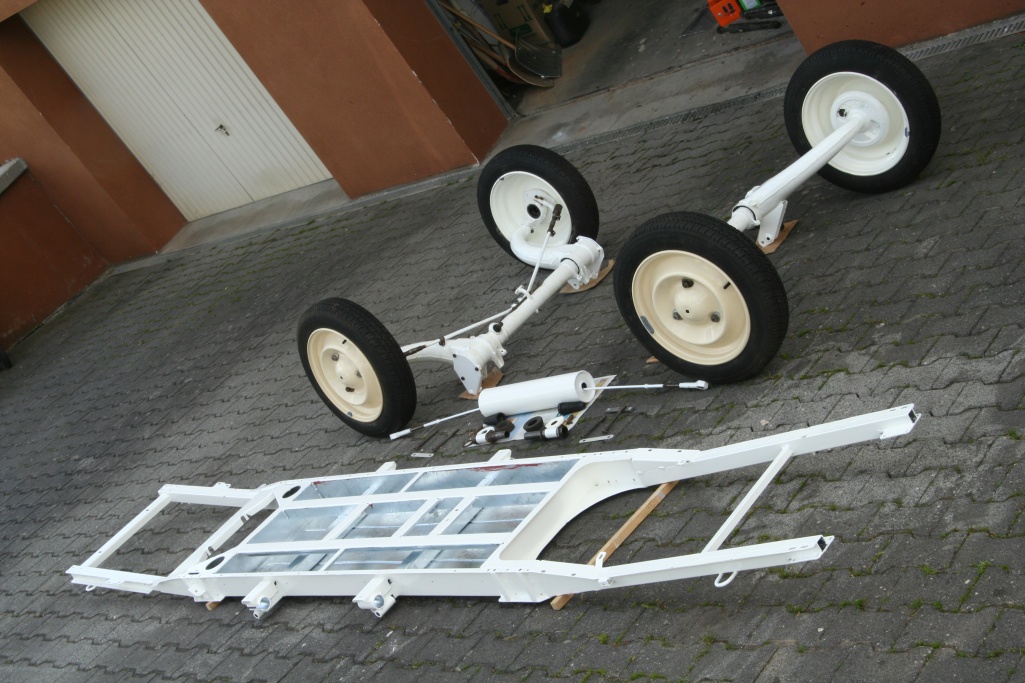 Chassis, axles and spring tubes. 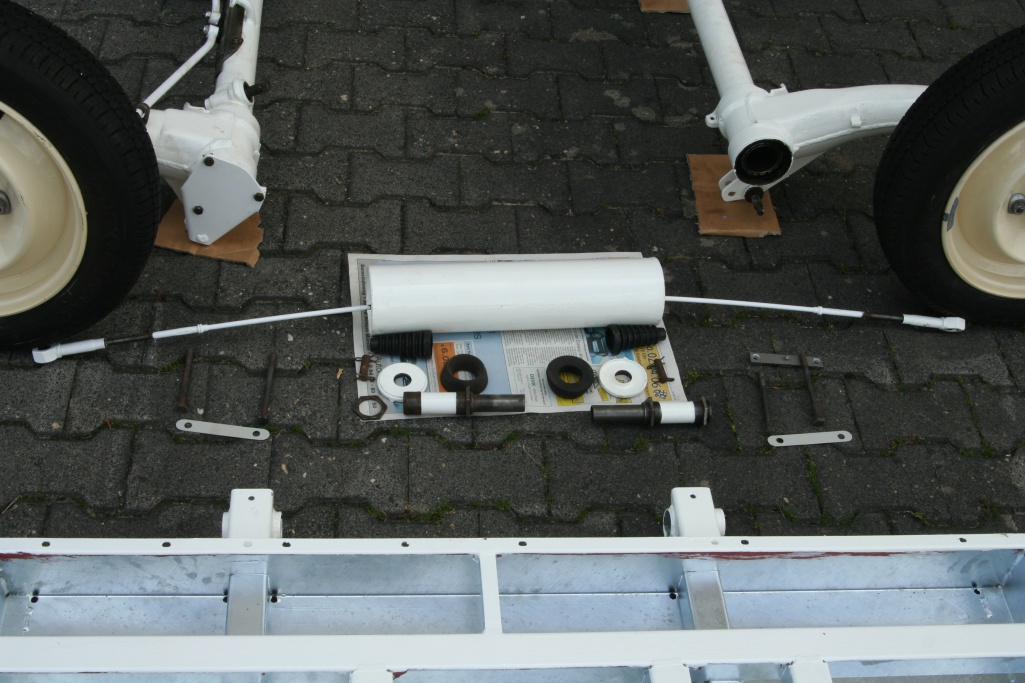 Spring tube and mounting elements of the axles.  Installation of the spring tubes: The spring tubes possess two hinged tie bars of different lengths. The longer one shows to the rear. First on the rear hinged tie bar a rubber buffer with the narrow side up-threaded to the spring tube, then the metal plate and an attaching nut is threated. Now the tube with the double screw thread is put into the attachment of the frame and the hinged tie bar of the spring tube is introduced. The nuts are now easily tightened. The pipe and its threads well grease, then the spring tube can be disassembled easily if necessary after years. 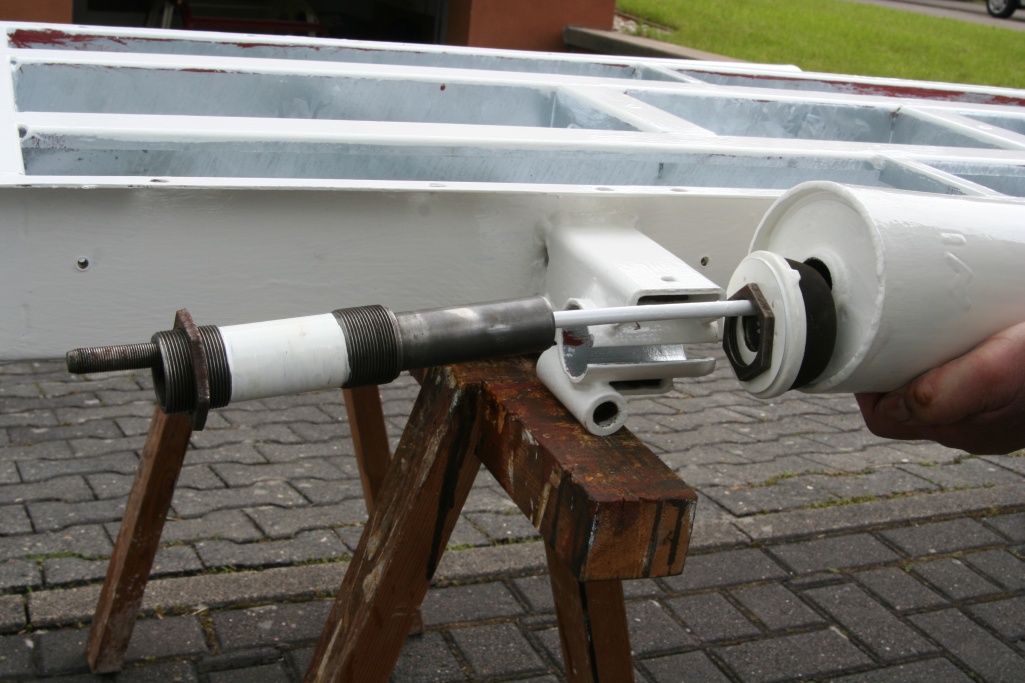 Now thread the rubber buffer, the metal plate and a nut on the front hinged tie bar. Put the prop into the slit of the rear attachment and finally fix it with the nuts and the double screw tube. Do not forget a greasing! 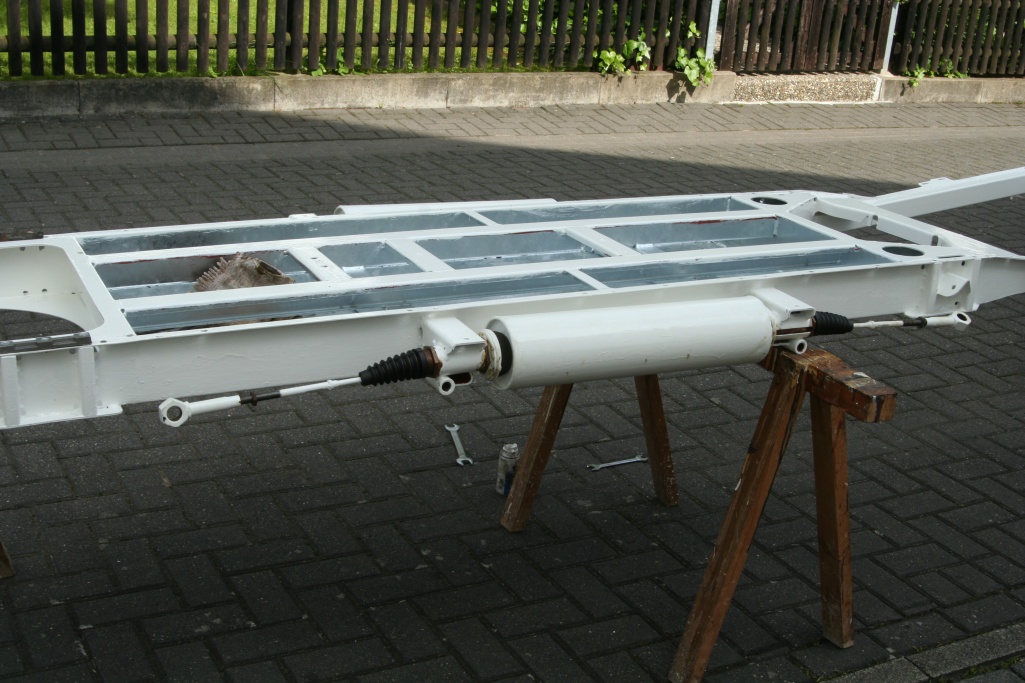 Now put the rubber grommet, the lock nut and the lug on the hinged tie bars. The exact attitude of the chassis frame can be set up with the help of the lugs and must be done when the car is completely installed. 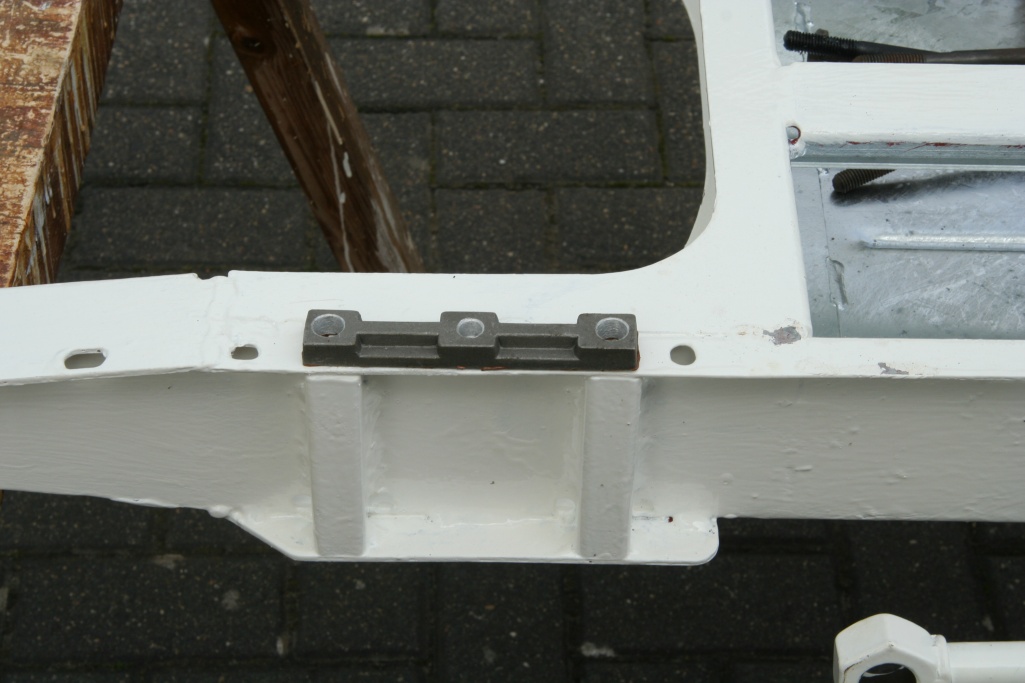 At the bearing area of the rear axle, aluminum spacer pieces are attached. Therefore the Screws are longer than those of the front axle. 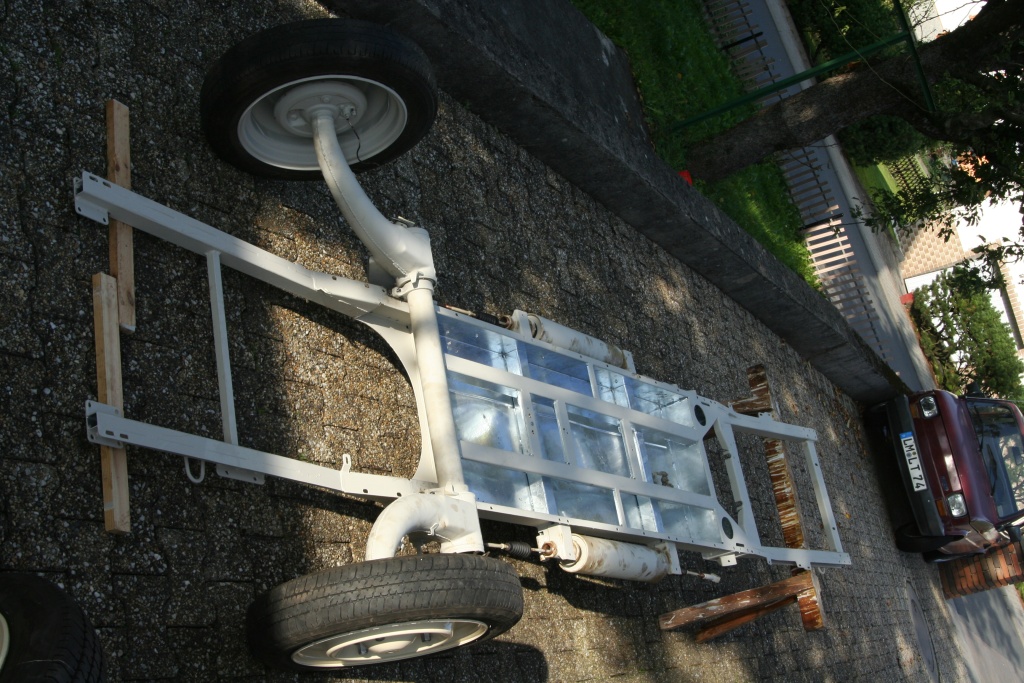 To the assembly I put the chassis in front on a wooden stand and put only small wooden plates under the back. Thus the rear axle can be fixed on the chassis. Do not forget the lock plates here! Now the hinged tie bars can be hung up with the help of the triangular pins. The thinner pins are used in front, those thicker in the back. 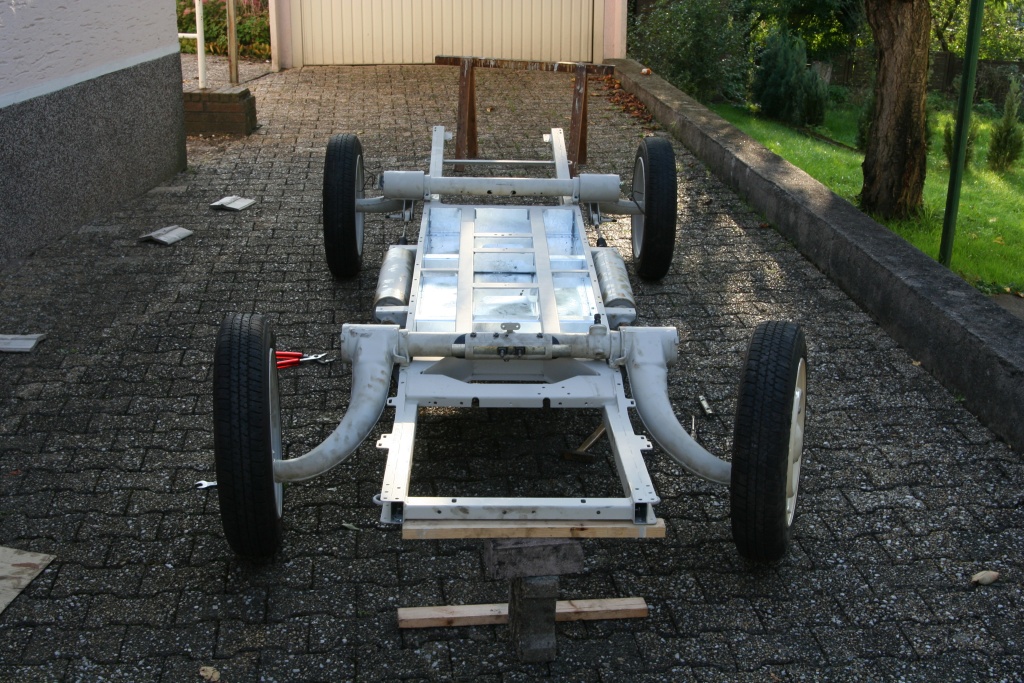 Now the stand at the front can be replaced by a construction of the right height. Fasten the front axle (lock plates!) and then the front hinged tie bars with the smaller triangular pins. 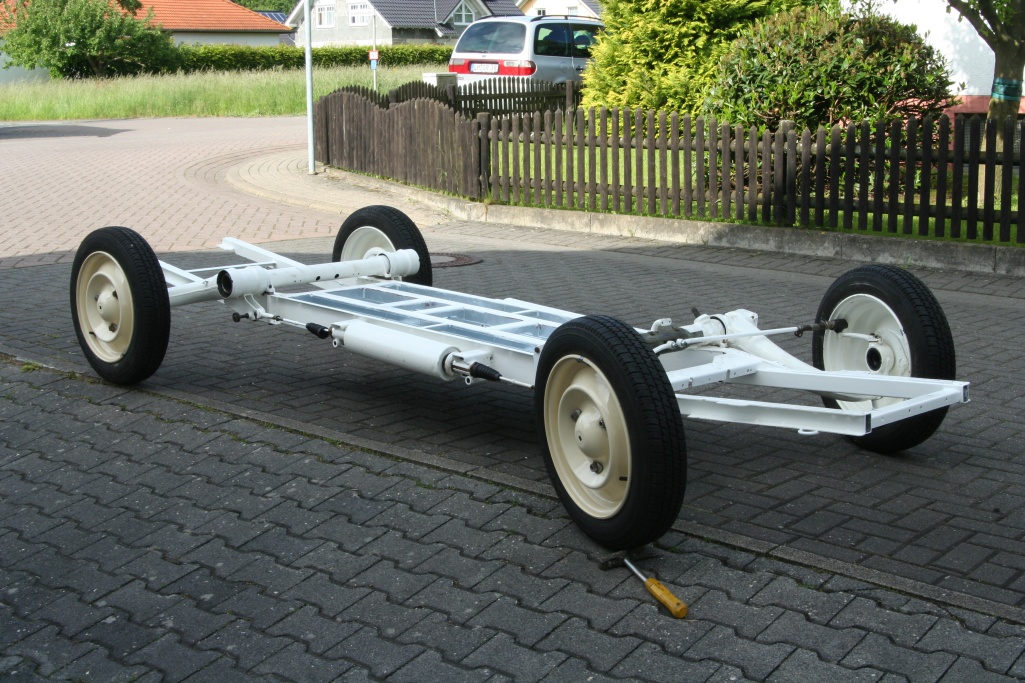 ...and the duck already stands on their own wheels.  The accurate chassis height can be set up only with the completely installed duck. In addition the vehicle must be on an even surface, may not be loaded (remove spare wheel) and the tank should be also as empty as possible. Now the height is to be set up in front to 19,5cm and in the back to 28,0cm with the help of the hinged tie bars. One measures thereby from the soil to the lower edge of the chassis in the center between the two fixing bolts of the front or rear axle. The photo shows the distance of the front axle. The wheel, at which the hinged tie bar is adjusted, is to be raised with the jacking equipment, since the hinged tie bar is not moveable otherwise due to the traction power on the thread. Before measuring unlock handbrake, shift gear to idle and swing the car briefly to loosen the tensions from the springs. 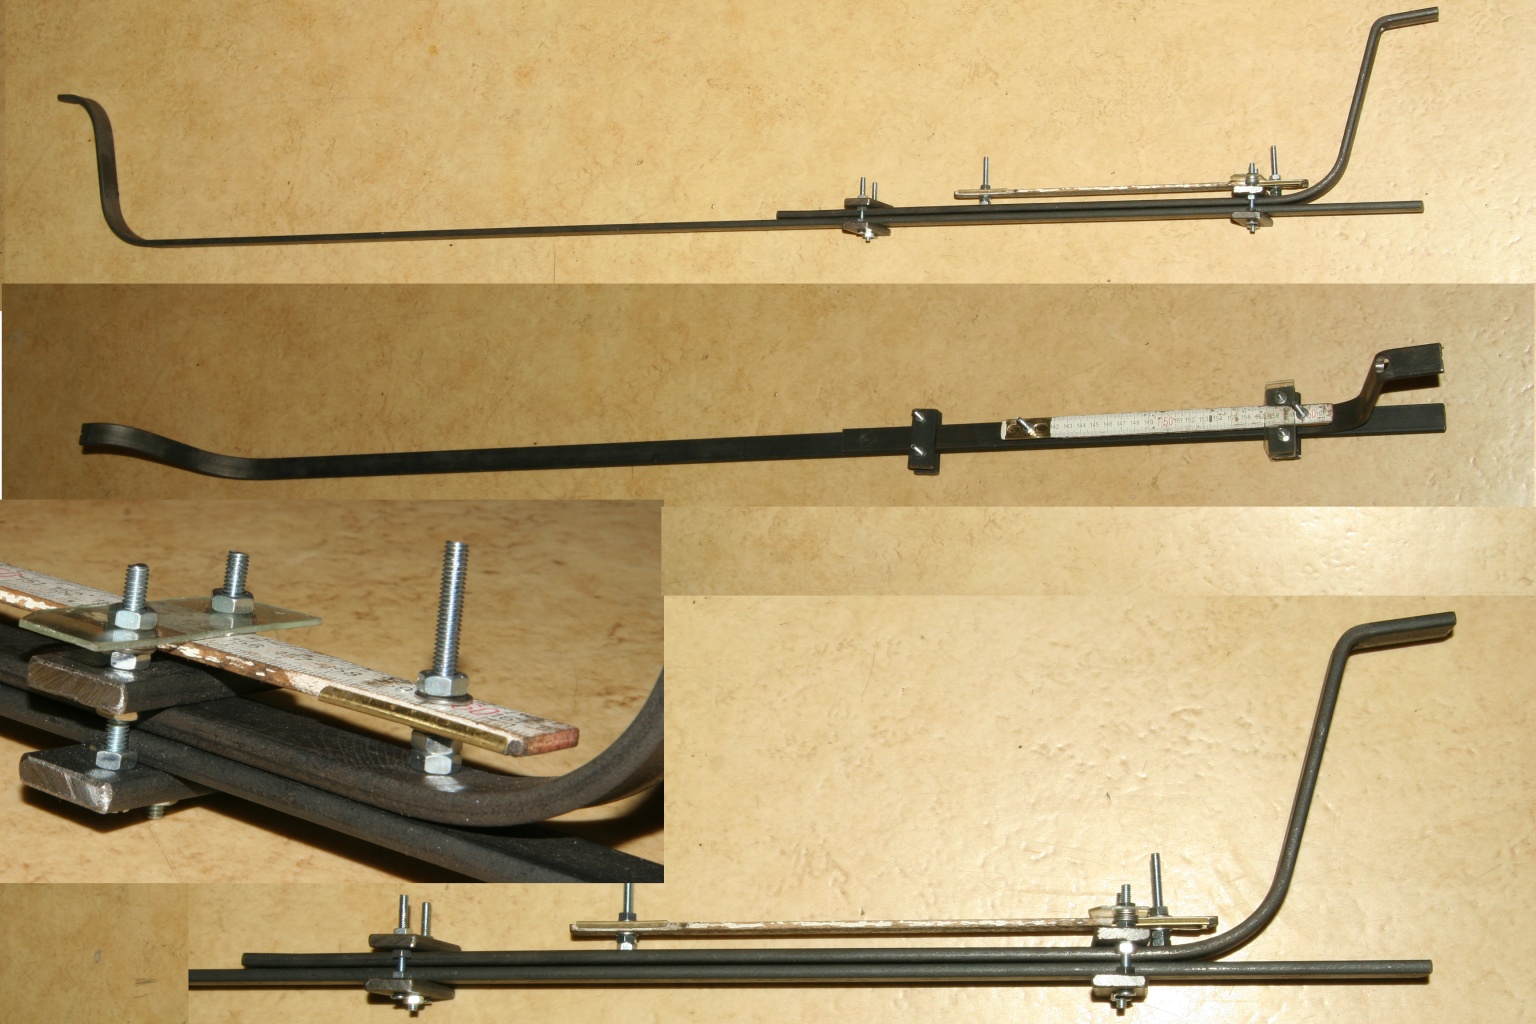 I would like to demonstrate the adjustment of the trace in this section. Only at the completely assembled duck with correct chassis height the trace can be finally adjusted. The measurement takes place with a self-made tool out of flat irons with the dimension 20 x 2mm, which can be seen in this picture and also be copied. 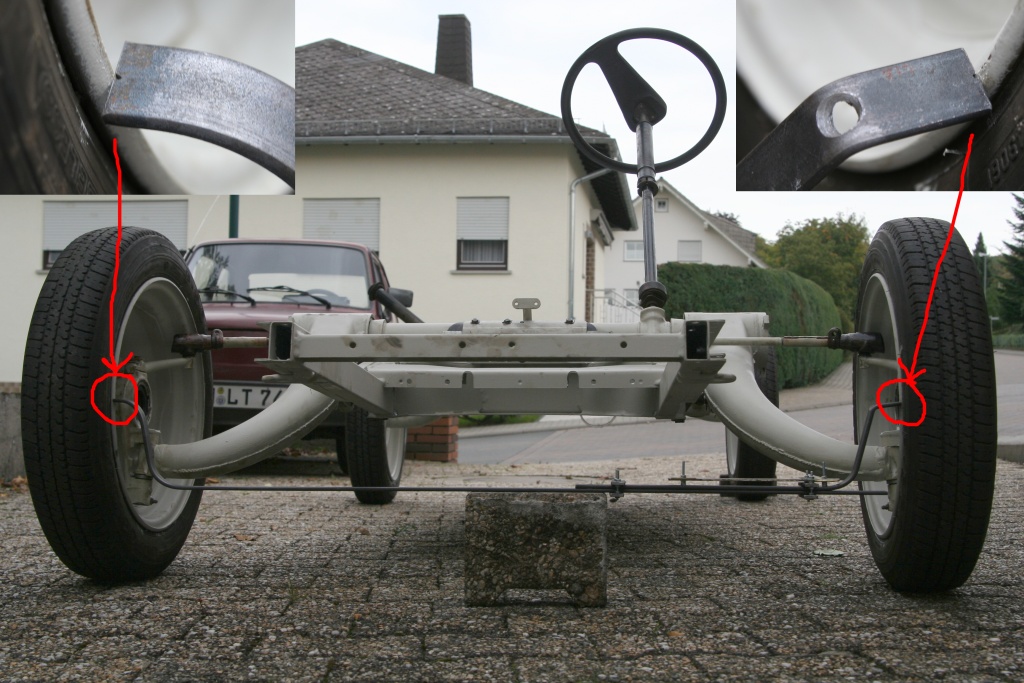 The measurment takes place on half the height of the rims in front and in the back. The tool is set with the notch at the edge of the rim. At the photo I put a paving-stone under the tool. For measuring however two persons should hold the ends slightly at the rim. 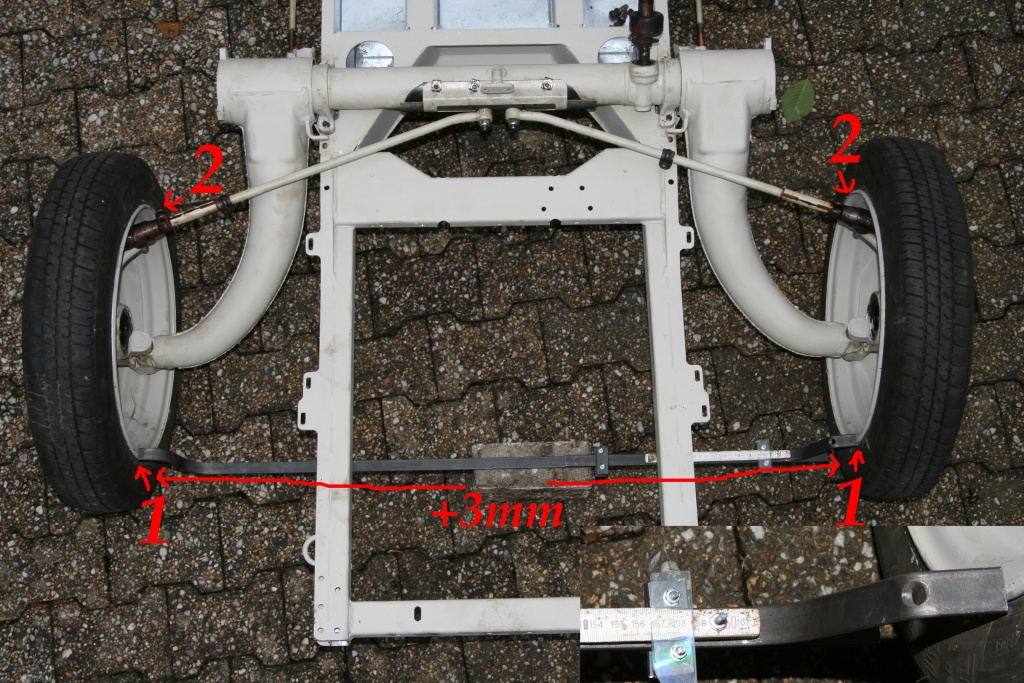 The difference in width should amount to 1-3mm, which means the rims should be 1-3mm further apart in front than in back. Since the rims are usually not completely new and round, the measurement should take place several times and push the vehicle forward or back thereby somewhat. When adjusting with the help of the hulls, be shure that the tie rods are approximately equivalent screwed in at both sides. Otherwise the steering element is not in central position when driving straight on. 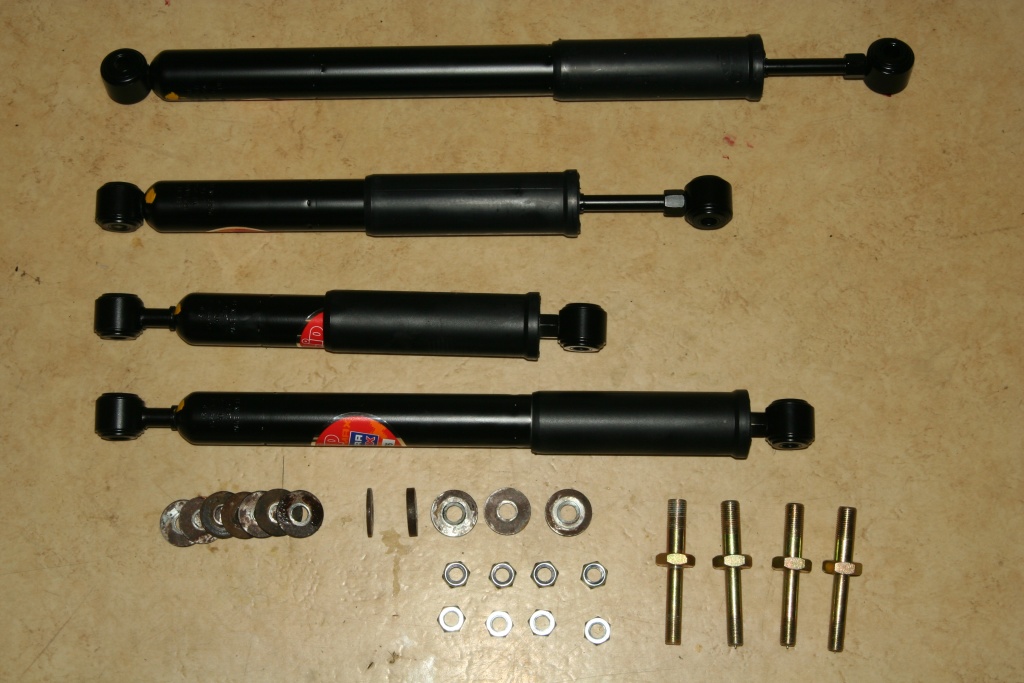 In order to stop waddeling of the finished duck, now the shock absorbers are to be assembled. The rear ones are somewhat longer than the front absorbers. The attachment at the chassis takes place with screw bolts. Buy the original parts, even if they are a little bit more expensive - it's worth it. The correct installation position of the shock absorbers is important. They possess a marking (see arrows in the photo), which must show upward in the inserted condition with this model! Consider the data of the manufacturer for the correct position. The shock absorbers are to be in-swung according to Citroën before the installation. Fasten the shock absorbers in a bench vise in vehicle installation position and push them 12 times slowly out and in. There are thicker and thinner grommets. The thicker ones are pushed first onto the screw bolts or on the attaching pins of the rear axle, then the shock absorbers and now the thinner disks are to be mounted. The thick disks are not used at the mounting point of the front axle. Self-locking nuts of the dimenson M12 are used for this.  Attached at the rear...  ...and the front. 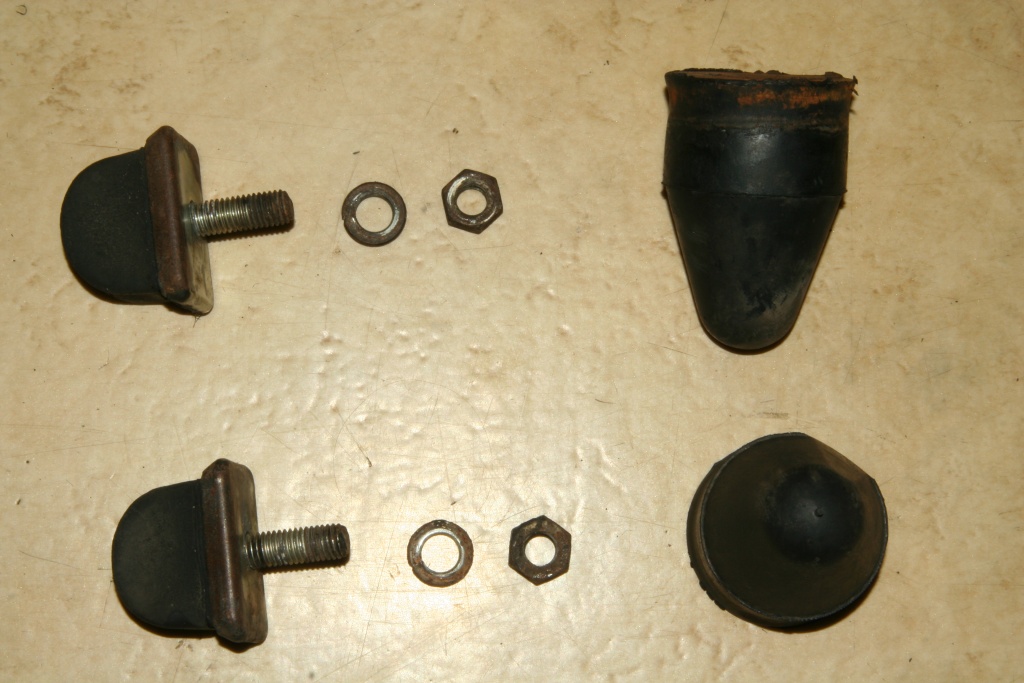 If the duck bounces too strongly, the stop buffers go into action. The attached front copies can be seen in the previous photo and sould be mounted best BEFORE the assembly of the front axle. Otherwise the chassis must be raised with jacking equipment for the installation. 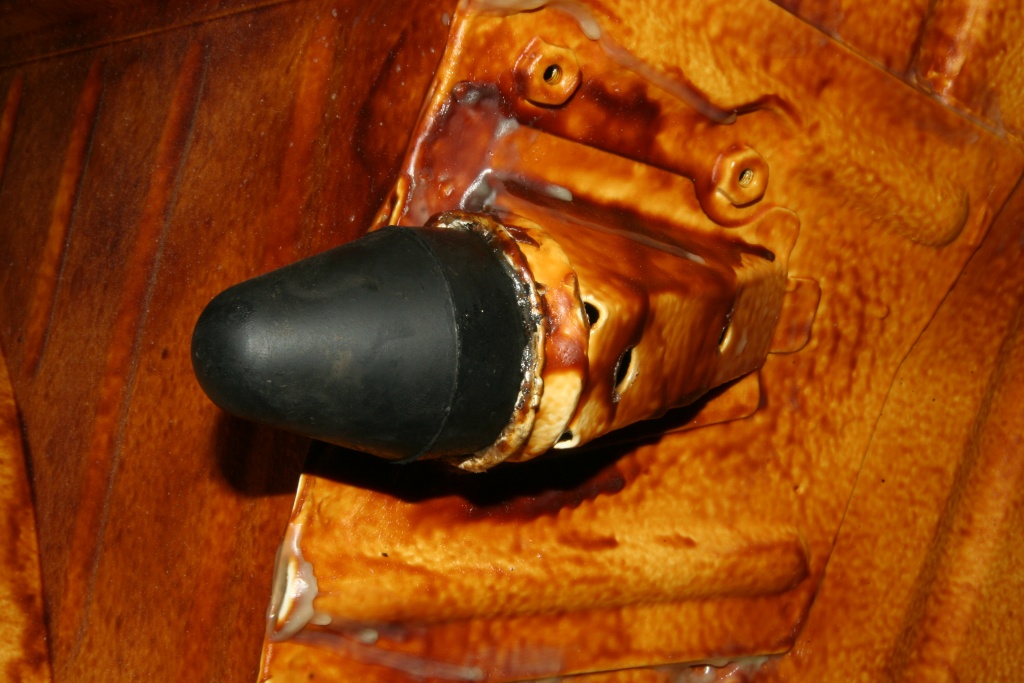 The rear limiters are attached at the interior fender of the housing (get clamped). I coated the contact area with grease well, in order to give the rust no chance. Back to front axle Forward to tank / fuel pump |